
OK ya'll....Here it is, just like I promised! The Skirt I can't Post, since it's not mine. But the Shirt and Dress I will...Here goes:
SHIRT:
*Take another one of the kid's shirts and lay it over the fabric of choice. This is how wide it's going to be. Add about an inch to one side and cut out a rectangular shape the length you want it to be (remember the sleeves will add some length, if you add sleeves) This will be the back(A).
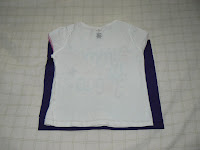
*Now make another rectangle that is 6-8 inches wider and 3 inches shorter than the first. This will be the front bottom(B). The front top (C) will be a 3 1/2 inch tall piece that is the same width as the back. (the 1/2 inch is for seem allowance)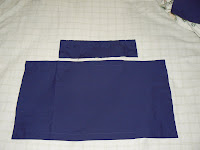
* Using whatever method you prefer, gather the center of the bottom front until it's the same width as the back. Sew the bottom and top front pieces together. I use a tight straight stitch then zig-zag over the seem allowance to keep frays at bay.
(If you don't want sleeves, just skip to the bottom)
*Take 2 more pieces of fabric about 4x8 (or bigger for your kid, but at that ratio) and fold in half to make it 4x4. Cut at diagonal 1 in from center diagonal, leaving the fold on the bigger half. (D) You can leave more space near the top corner if you want a deeper neckline. I just cut it larger than I think I need then hand basted it together, threw it on Sydney and tried it, then cut shorter if I needed.
*Now take a sleeve and lay it on the front at the corner where the sleeve will be attached (leave room for neckline!) Mark and cut. Do this for both sides, front and back.
*Now would be a good time to hem the top around the neckline of all pieces. Also hem the outside of the sleeves. DO NOT hem the bottom, yet! You run the risk of the front and back not being even.
*Now attach the sleeves. Then sew the front to the back along the sides. Now you can hem the bottom. * If the neckline is not wide enough cut a 3 in. slit down the back starting at the neck. Hem edges and sew a single button at the top. For an easy button hole just sew a small piece of elastic near the top of the neckline, opposite the button. Elastic loops over the button and Voila: Complete shirt!!!
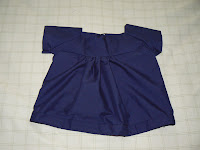
SHIRT:
*Take another one of the kid's shirts and lay it over the fabric of choice. This is how wide it's going to be. Add about an inch to one side and cut out a rectangular shape the length you want it to be (remember the sleeves will add some length, if you add sleeves) This will be the back(A).
*Now make another rectangle that is 6-8 inches wider and 3 inches shorter than the first. This will be the front bottom(B). The front top (C) will be a 3 1/2 inch tall piece that is the same width as the back. (the 1/2 inch is for seem allowance)
* Using whatever method you prefer, gather the center of the bottom front until it's the same width as the back. Sew the bottom and top front pieces together. I use a tight straight stitch then zig-zag over the seem allowance to keep frays at bay.
(If you don't want sleeves, just skip to the bottom)
*Take 2 more pieces of fabric about 4x8 (or bigger for your kid, but at that ratio) and fold in half to make it 4x4. Cut at diagonal 1 in from center diagonal, leaving the fold on the bigger half. (D) You can leave more space near the top corner if you want a deeper neckline. I just cut it larger than I think I need then hand basted it together, threw it on Sydney and tried it, then cut shorter if I needed.
*Now take a sleeve and lay it on the front at the corner where the sleeve will be attached (leave room for neckline!) Mark and cut. Do this for both sides, front and back.
*Now would be a good time to hem the top around the neckline of all pieces. Also hem the outside of the sleeves. DO NOT hem the bottom, yet! You run the risk of the front and back not being even.
*Now attach the sleeves. Then sew the front to the back along the sides. Now you can hem the bottom.
* If the neckline is not wide enough cut a 3 in. slit down the back starting at the neck. Hem edges and sew a single button at the top. For an easy button hole just sew a small piece of elastic near the top of the neckline, opposite the button. Elastic loops over the button and Voila: Complete shirt!!! DRESS: (Do everything the same as above with the following exceptions)
* make it longer (this might seem like a "Duh" moment, but you'd be suprised!)
*I omitted the gathering in the front by making the front and back the same size and shape.
* Add a ribbon around where you want the waist. Just tack it at the side seems and leave loose at the back. This makes a real cute bow at the mid back.
Other than these things the basic pattern is the same.
No comments:
Post a Comment